
Size
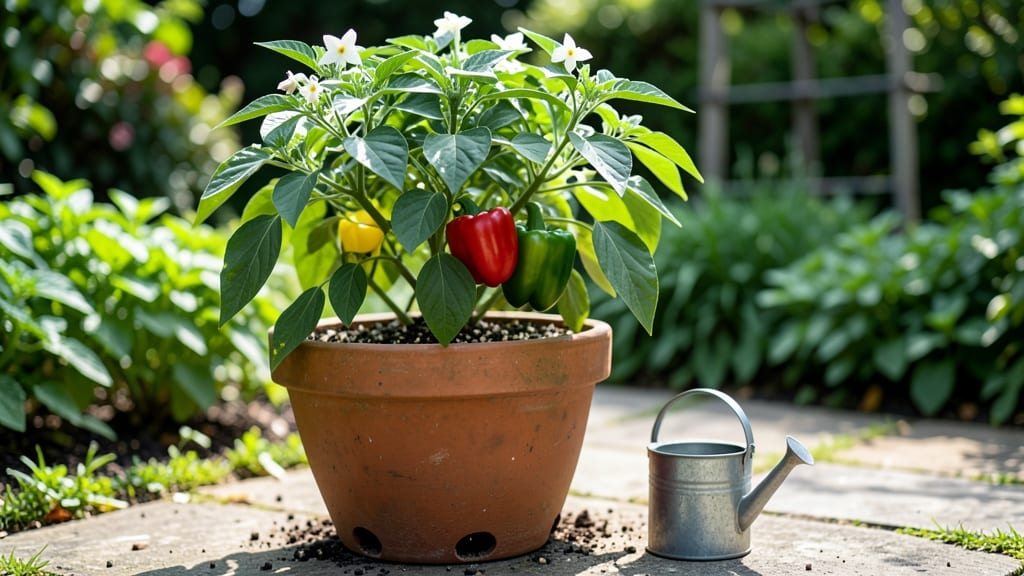
Growing pepper plants in pots means fresh, homegrown heat and sweetness on your patio or balcony—no yard required. 🌱 I’ve turned my small balcony into a mini pepper farm, and the key isn’t just choosing the right pots, but matching them to the plant’s needs at every stage.
Last summer, my 5-gallon containers produced enough jalapeños and bell peppers to share with neighbors, all from plants that stayed compact and healthy.
Start with well-draining potting mix and containers at least 12 inches deep—deeper for larger varieties like bananas or cubans. Place them in a spot with 6-8 hours of sunlight daily, and water when the top inch of soil feels dry.
The trick is consistency: peppers hate soggy roots but also can’t handle drought. A 1-inch-per-week watering schedule works for me, adjusting for rain or extreme heat.
You’ll notice the first flowers in 6-8 weeks, followed by peppers that ripen in colors from green to red, yellow, or purple. Prune suckers (those little shoots in the joint) to focus energy on fruit, and feed with balanced fertilizer every 4-6 weeks.
My bush varieties like ‘Snack Mix’ and ‘Lunchbox’ stay tidy, while taller types need staking—but the payoff is worth it.
Common pitfalls? Overwatering (yellow leaves) or pests like aphids (sticky residue). I solved both with neem oil sprays and better drainage. By late summer, you’ll be harvesting peppers all season—no bitter surprises, just flavor-packed bounty in any space.
📚 In This Guide
- What you need
- Instructions
- Tips and common mistakes
- Wrapping up and next steps
What you need
- ● Containers: 5-gallon pots (or larger) with drainage holes (minimum 12 inches deep for mature plants). Quantity: 1 per plant.
- ● Potting Mix: High-quality, well-draining pepper-specific mix or a blend of 60% potting soil + 30% perlite + 10% compost. Quantity: ~3-5 gallons per pot.
- ● Pepper Seeds or Seedlings: Choose disease-resistant varieties (e.g., Jalapeño, Bell, Cayenne, or Habanero). Quantity: 1-2 seeds per pot (or 1 seedling).
- ● Fertilizer: Balanced 10-10-10 or 5-10-10 fertilizer (organic options like fish emulsion or worm castings work too!). Quantity: Follow label instructions.
- ● Watering Can or Hose: With a gentle spray nozzle to avoid disturbing soil.
- ● Drainage Tray or Saucer: To catch excess water and prevent root rot.
- ○ Support (Optional but Helpful): Small stakes or cages (4-6 inches tall) for taller varieties like Bell Peppers.
- ● Trowel or Small Shovel: For transplanting seedlings or mixing soil.
- ● Pruning Shears: To trim dead leaves or encourage bushier growth.
- ● pH Test Kit: To ensure soil pH is between 6.0–6.8 (peppers love slightly acidic soil!).
- ○ Mulch (Optional): Straw or shredded leaves to retain moisture and regulate temperature.
- ● Grow Lights (Indoor Growers): LED or fluorescent lights (12–16 hours/day) if natural light is limited.
Step-by-step instructions for growing pepper plants in pots
Here's how I grow bold, productive pepper plants in containers—no bitter surprises or stunted growth.
🌱 Step 1: Select the Right Containers and Soil Mix
Choose 5-gallon pots for each pepper plant—this gives roots room to spread without crowding. I use terra cotta pots because they breathe better than plastic and help prevent root rot. Make sure each pot has drainage holes at the bottom, or drill them yourself if needed. A saucer underneath catches excess water but doesn't let roots sit in standing water.
Fill the pot with a well-draining potting mix—never garden soil. I blend 50% premium potting mix with 30% perlite and 20% compost for fluffy, nutrient-rich soil. Press the mix down lightly to remove air pockets, then water it until moisture runs out the drainage holes. This pre-moistening ensures the soil stays evenly damp without waterlogging.
☀️ Step 2: Plant Seeds or Transplants at the Right Time
Start seeds 8-10 weeks before your last frost date indoors under grow lights (peppers need 14-16 hours of light daily). If using transplants, wait until after the last frost and soil temperatures reach at least 65°F. Plant one seed per pot at a depth of ¼ inch, or place a transplant so the top of the root ball sits just below the soil line. Gently firm the soil around the stem to eliminate air gaps.
Here's the thing—peppers hate being disturbed. If you're transplanting, water the plant first to reduce shock, then handle the root ball carefully. Place a toothpick or small stake beside the seedling to mark its location—you'll forget which pot is which after a few weeks.
💧 Step 3: Water Deeply and Maintain Consistent Moisture
Water deeply but infrequently—peppers prefer slightly dry soil between waterings. Stick your finger 1 inch into the soil; if it feels dry, water until moisture runs out the drainage holes. Overwatering leads to blossom-end rot, while underwatering causes bitter fruit. I water in the morning so excess moisture evaporates during the day.
Mulch the soil surface with ½ inch of straw or shredded leaves to retain moisture and keep roots cool. Avoid letting mulch touch the stems—this traps moisture and invites disease. You'll notice darker green leaves and faster growth once the mulch settles in.
✂️ Step 4: Provide Support and Prune for Better Harvests
As peppers grow, they need support to prevent stems from snapping under fruit weight. Install a small cage or bamboo stake at planting time—peppers resent being moved later. Gently tie the main stem to the support with soft plant ties as it grows, but don’t cinch too tight. You want room to grow, not a tourniquet.
Prune suckers (the small shoots that form in the leaf axils) to direct energy into fruit production. Use clean, sharp scissors to snip suckers just above the leaf. I remove about half the suckers on each plant—this keeps the plant manageable while boosting pepper size. Watch for yellowing leaves after pruning; this is normal as the plant adjusts.
☀️ Step 5: Fertilize and Protect for Maximum Yields
Feed peppers with a balanced, water-soluble fertilizer (like 10-10-10) every 2-3 weeks starting when flowers appear. I mix ½ teaspoon of fertilizer per gallon of water to avoid burning roots. Peppers also love a monthly dose of compost tea for micronutrients. Stop fertilizing 4-6 weeks before harvest—too much nitrogen late in the season leads to leafy growth at the expense of fruit.
Watch for pests like aphids or spider mites, especially in hot, dry weather. Spray plants with neem oil at the first sign of trouble—it’s organic and effective. If birds or squirrels eye your peppers, cover the pots with floating row fabric once fruit starts coloring. You’ll know it’s working when peppers ripen evenly and stay intact until harvest time.
Tips & tricks for growing pepper plants in pots
Real talk: Container gardening for peppers isn't just about throwing seeds in dirt. These small details make all the difference between stunted plants and a bountiful harvest.
Container Selection Matters: While 5-gallon pots are ideal, don't overlook the material. Terra cotta wicks moisture away naturally, but if you prefer plastic, drill extra drainage holes—they're essential. I've found that pots with 12-14 inches in diameter give peppers enough stability to support their weight as they grow. The key is balancing root space with wind resistance, especially if you're on a balcony or patio.
The Light Factor: Those 14-16 hours of daily light are non-negotiable for peppers. If your grow lights aren't strong enough, supplement with a reflective surface behind the plants to maximize light efficiency. I've seen peppers grow toward the light source, so rotate your pots quarter-turn daily to ensure even growth. South-facing windows work for transplants, but seeds need that artificial light from day one to prevent leggy, weak seedlings.
Soil Science: That 50-30-20 mix of premium potting soil, perlite, and compost isn't just arbitrary—it's about aeration and drainage. For extra insurance against blossom-end rot, add 1 teaspoon of calcium carbonate to each pot at planting. I've seen this simple addition nearly eliminate the problem in my containers. Also, avoid compacting the soil too much when pressing it down—you want roots to establish easily, not fight through dense soil.
Pest Prevention: Neem oil is your first line of defense, but I've found that yellow sticky traps placed near your pepper pots catch early warnings of whiteflies and aphids before they become a problem. The moment you see these pests, act fast—they multiply quickly in container gardens where plants are more isolated. I also recommend keeping a spray bottle of water nearby—a good spray-down in the morning can knock off pests and refresh the plants before the heat of the day sets in.
Pro Tips for Grow Pepper Plants In Pots
- Real talk: Container gardening for peppers isn't just about throwing seeds in dirt.
- Container Selection Matters: While 5-gallon pots are ideal, don't overlook the material.
- The Light Factor: Those 14-16 hours of daily light are non-negotiable for peppers.
Frequently asked questions
Got questions about growing peppers in pots?
You’re not alone! Here are answers to the most common concerns—so you can grow bold, flavorful peppers without the headaches.
What’s the best pot size for pepper plants?
For one plant, aim for a 5-gallon pot (12–14 inches deep). Smaller pots (3–5 gallons) work for dwarf varieties like ‘Snackable’ or ‘Lunchbox,’ but roots get cramped fast. Pro tip: Add a 3-inch layer of drainage material (gravel, broken pots) at the bottom to prevent soggy roots!
How long does it take for pepper plants to produce fruit in pots?
Patience is key! From seed, expect 80–90 days for bell peppers and 90–120 days for hot varieties like jalapeños or habaneros. Speed it up by starting seeds indoors 8–10 weeks before your last frost and using high-quality potting mix (pepper plants hate compacted soil). Bonus: Warmth (70–85°F) = faster fruiting!
Why aren’t my pepper plants flowering or fruiting?
Common culprits: not enough sunlight (peppers need 6–8+ hours daily), low temperatures (below 60°F stalls blooms), or overcrowding. Fix it: Move pots to sunnier spots, prune lower leaves for airflow, and fertilize with a balanced 10-10-10 formula when buds appear. Watch for pests! Spider mites love stressed plants.
Can I grow peppers in pots year-round?
Not without help! Pepper plants need warmth—they’re tropical divas. In cold climates, grow them indoors near a sunny window or under grow lights (12+ hours/day) during winter. For outdoor pots, extend the season with a frost cloth or move containers to a sheltered spot. Pro move: Use black pots to absorb heat in spring/fall!
What’s the easiest pepper variety for beginners?
Start with dwarf or compact varieties like:
- ‘Jalapeño M’ (mini, prolific)
- ‘Shishito’ (mild, bushy, great for stir-fry)
- ‘Lunchbox’ bell pepper (tiny but productive)
- ‘Snackable’ cherry pepper (sweet, cluster-bearing)
Wrapping up and next steps
Growing peppers in pots is a rewarding way to enjoy fresh, flavorful harvests—even in small spaces! 🌱 With the right containers, soil, sunlight, and care, you’ll avoid common pitfalls like stunted growth or bitter flavors.
Start small, stay consistent with watering and feeding, and soon you’ll be savoring homegrown peppers in salads, salsas, or sauces.
Ready to dive in? Pick your favorite pepper variety and grab those pots—your garden adventure begins now! 🌶️