
Planting
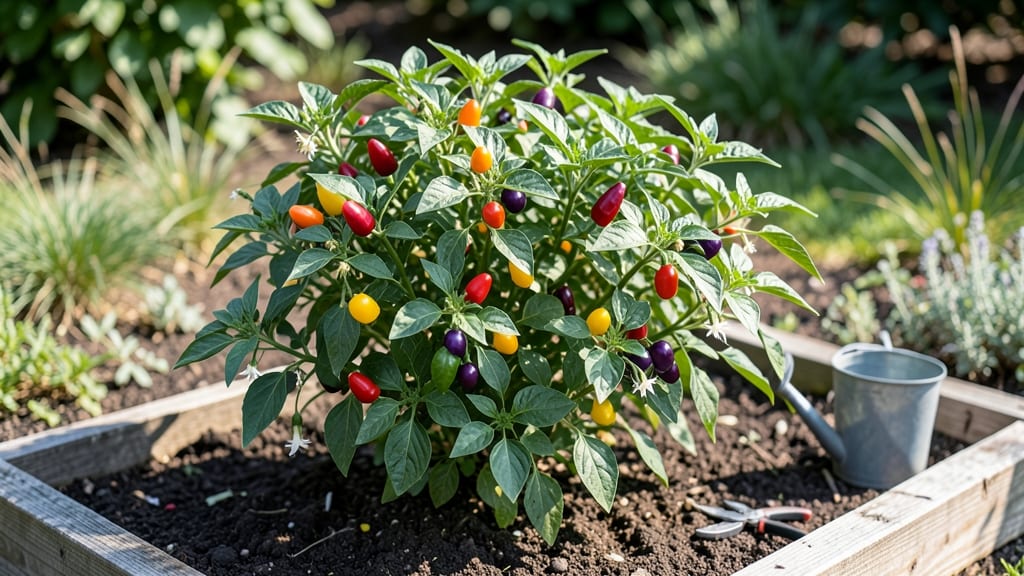
Growing a chilly chili pepper plant on your balcony could mean homemade hot sauce by summer. 🌿 I learned the hard way that these fiery friends need warmth, patience, and the right setup—but once they thrive, the payoff is worth every blistering drop of sweat (and sometimes tears).
Start with seeds or seedlings in well-draining soil and a south-facing spot (or grow lights indoors). Peppers like it hot—both in temperature (70°F+) and in flavor. Varieties like Carolina Reaper or Ghost Pepper demand extra care, but even milder jalapeños need consistent warmth to set fruit.
By midsummer, you’ll watch tiny buds swell into peppers that turn from green to red (or purple, or yellow, depending on the variety). The key? No cold drafts, even moisture, and pruning to encourage bushier growth.
Vertical planters save space while keeping leaves off damp soil, which prevents fungal issues. This works for balconies, patios, or sunny windowsills—just adjust light and water as seasons shift. Ready to grow your own heat? Let’s get those seeds started!
📚 In This Guide
- What you need
- Instructions
- Tips and common mistakes
- Wrapping up and next steps
What you need
- ● Chili pepper seeds or seedlings: Choose heat-resistant varieties like Carolina Reaper, Habanero, or Ghost Pepper. Buy 3–5 seeds or 1–2 seedlings per plant.
- ● Vertical garden planter: A wall-mounted pocket planter (12–18" deep), fabric grow bags, or a hanging planter with drainage holes (minimum 5–7 pockets for spacing).
- ● High-quality potting mix: A lightweight, well-draining blend (e.g., 60% peat moss, 20% perlite, 20% compost). Use 1–2 gallons per plant.
- ● Slow-release fertilizer: A balanced 10-10-10 or organic option like fish emulsion (follow package rates for vertical gardens).
- ● Drip irrigation system or self-watering planter: Ensures consistent moisture without overwatering.
- ● Support stakes or trellis: Lightweight bamboo or plastic stakes (4–6" tall) to prop up plants as they grow.
- ● Pruning shears: Sharp, sterilized shears for trimming (or small scissors in a pinch).
- ● Gloves: Heavy-duty gardening gloves—chili peppers pack a punch! 🌶️
- ○ Spray bottle: For misting seedlings (optional but helpful for humidity).
- ● Sunlight access: 6+ hours of direct sunlight daily (south-facing window or grow lights for indoor setups).
- ○ Heat mat (optional): For seedlings—keeps soil at 75–85°F to speed up germination.
- ● pH test kit: Ensures soil pH is 5.8–6.8 (chilis thrive in slightly acidic soil).
- ● 🌡️ Temperature control: Chili peppers hate cold drafts—keep them above 55°F at night.
- ● ✨ Container depth: Deeper pockets (12"+) allow for better root growth and higher yields.
- ● 🔥 Heat warning: Wear gloves when handling plants—even the leaves can irritate skin!
Step-by-Step instructions for growing chili peppers vertically
Transform your balcony into a spicy green wall with these space-saving techniques.
🪴 Step 1: Select and Prepare Your Vertical Growing System
Choose a sturdy vertical planter with at least 12 inches of depth to accommodate mature root systems. I prefer fabric grow bags because they allow roots to breathe and prevent waterlogging. For 4 plants, a 4-tier pocket planter or wall-mounted trellis works perfectly. Ensure each pocket has drainage holes—chili peppers hate soggy feet.
Fill each pocket with a well-draining potting mix (I blend 60% premium potting soil, 30% perlite, and 10% compost). Avoid garden soil—it compacts and suffocates roots. Moisten the mix until it feels like a wrung-out sponge: damp but not dripping. This ensures roots establish quickly without drowning.
🌱 Step 2: Plant Seedlings at the Right Depth and Spacing
Dig a hole in each pocket twice as deep as the root ball but no deeper—this prevents stem rot. Gently remove the seedling from its nursery pot and tease the roots outward if they’re circling. Place it in the hole so the top of the root ball sits just below soil level. Chili peppers need stability, so firm the soil around the base with your fingers.
Space plants 12-18 inches apart if using a wall trellis or 6-8 inches apart in deep pockets. Crowding stresses plants and spreads disease. If using a trellis, insert soft plant ties at planting time to secure stems as they grow. Water deeply right after planting—this settles the soil and eliminates air pockets around roots.
☀️ Step 3: Provide Full Sun and Strategic Support Early
Chili peppers crave 6-8 hours of direct sunlight daily. On balconies, position your vertical garden where it gets south or west exposure. If natural light is limited, supplement with a full-spectrum LED grow light placed 6-12 inches above the plants for 14-16 hours/day. You’ll know light is sufficient when leaves stay deep green and crisp—no yellowing or stretching.
As soon as seedlings hit 6 inches tall, install soft twine or burlap strips to guide vines upward. Avoid metal or plastic ties—they can girdle stems as plants thicken. Train the main stem vertically first, then let side branches develop into a bushy frame. Prune suckers (those little shoots in the leaf axils) to encourage upward growth and fruit production.
💧 Step 4: Water and Feed for Maximum Heat Production
Water deeply every 2-3 days, soaking until water runs out the drainage holes. Let the top 1-2 inches of soil dry between waterings—chilis hate soggy conditions but need consistent moisture. I use a drip irrigation system to keep water off leaves, which prevents fungal diseases like powdery mildew. In extreme heat, you may need to water daily, but always check soil moisture first.
Feed plants every 2 weeks with a balanced liquid fertilizer (10-10-10 or 5-5-5) diluted to half strength. Once flowers appear, switch to a low-nitrogen, high-phosphorus fertilizer (like 5-10-10) to boost fruiting. You’ll see the difference when buds form—plants will develop thicker stems and glossier leaves, signaling they’re ready to produce heat.
✂️ Step 5: Prune and Harvest for Continuous Production
Pinch off the first few flowers that appear to encourage stronger root and stem growth. This might seem counterintuitive, but it pays off with bigger, hotter peppers later. Once the plant is established (after 6-8 weeks), let it flower freely. Prune yellowed or diseased leaves immediately to keep air circulating and prevent spread.
Harvest peppers when they reach 75% of their mature size for continuous production. Use clean pruning shears to snip stems just above a leaf node. This encourages new branches to form. Store harvested peppers in a cool, dry place—they’ll ripen further off the plant. With proper care, your vertical chili garden can produce all season long, even in small spaces.
Tips & tricks for perfect vertical chili pepper growth
Here's what nobody tells you about transforming your balcony into a thriving vertical chili garden.
Soil Science: The 60-30-10 blend of premium potting soil, perlite, and compost in Step 1 isn't just arbitrary—it creates the perfect balance. The perlite prevents compaction in vertical pockets where drainage is critical, while the compost provides essential microbes that break down nutrients chili peppers crave. I've seen plants wilt when garden soil is used because it lacks the air pockets these roots need to thrive. Pro tip: Add a handful of worm castings to your mix for an extra nutrient boost that translates to hotter peppers.
Lighting Strategy: The 6-8 hours of direct sunlight in Step 3 is non-negotiable, but here's the secret: position your vertical garden to catch morning sun first. This gradual heat exposure prevents sunburn on delicate leaves. For indoor setups, place your LED grow light on a timer that mimics natural daylight cycles—14-16 hours is ideal, but start with 12 hours if your plants show signs of stretching (that's when they're reaching for more light). You'll notice the difference when leaves stay deep green rather than turning yellow or leggy.
Pruning Precision: When you pinch off those first few flowers in Step 5, you're not just being impatient—you're redirecting the plant's energy. This technique forces the plant to develop a stronger root system and thicker stems that can support more fruit later. I've seen plants that skip this step produce smaller peppers with less heat. The key is to be patient: wait until the plant has established for 6-8 weeks before letting it flower freely. This might seem counterintuitive, but trust me on this—it pays off with bigger, hotter peppers.
Watering Wisdom: The 2-3 day watering schedule in Step 4 works perfectly in moderate climates, but here's what to watch for: in extreme heat, you might need to water daily. The telltale sign is when the top 1-2 inches of soil feel completely dry. I've learned this the hard way—overwatering leads to root rot, while underwatering causes blossom-end rot in the peppers. A drip irrigation system is worth the investment because it delivers water directly to the roots without wetting the leaves, which prevents fungal diseases like powdery mildew that can devastate your plants.
Pro Tips for Chilly Chili Pepper Plant
- Here's what nobody tells you about transforming your balcony into a thriving vertical chili garden.
- Soil Science: The 60-30-10 blend of premium potting soil, perlite, and compost in Step 1 isn't just arbitrary—it creates the perfect balance.
- Lighting Strategy: The 6-8 hours of direct sunlight in Step 3 is non-negotiable, but here's the secret: position your vertical garden to catch morning sun first.
Frequently asked questions
Got questions about growing chilly chili pepper plants in tight spaces? You’re not alone! Here are some of the most common queries—plus quick, actionable answers to help your vertical spice garden thrive.
How long does it take for chili peppers to grow and produce fruit?
Most chili pepper plants take 60–90 days from transplanting to harvest, depending on the variety. Jalapeños and Serranos mature faster (8–10 weeks), while hotter peppers like Habaneros may take 12+ weeks. Patience pays off—consistent warmth (70°F+) and sunlight speed up fruiting!
Can chili peppers survive cold weather, or do I need to bring them inside?
Chili peppers are tropical and hate temps below 50°F. If frost is forecast, move potted plants indoors near a sunny window or under grow lights. For balcony gardens, use frost cloth or a mini greenhouse to protect them overnight. Pro tip: Harden off plants gradually before transitioning to avoid shock!
What if my chili plant only has leaves and no peppers?
No peppers? Don’t panic! Common causes include:
- Not enough light: Move to a sunnier spot (6+ hours of direct light daily).
- Over-fertilizing with nitrogen: Switch to a low-nitrogen, high-phosphorus fertilizer to boost flowering.
- Stress from temperature swings: Keep temps stable (65–85°F) and avoid drafts.
- Young plants: Some varieties need 8+ weeks to flower—be patient!
Can I grow other peppers or herbs alongside chilis in my vertical garden?
Companion plants like basil, thyme, and mild peppers (e.g., bell peppers) thrive alongside chilis. Avoid planting fennel or brassicas (broccoli, cabbage), as they stunt growth. For vertical setups, use self-watering planters or trellises to maximize space—just ensure all plants get equal sunlight!
Why are my chili peppers turning yellow or dropping off?
Yellowing or falling peppers usually signal stress. Check for:
- Overwatering: Let soil dry slightly between waterings (stick your finger in—top inch should be dry).
- Underwatering: Drooping leaves + peppers? Water deeply but avoid soggy soil.
- Pests: Inspect for aphids or spider mites (spray with neem oil if needed).
- Nutrient deficiency: Yellow leaves? Feed with a balanced fertilizer (10-10-10).
Most peppers recover quickly if you address the issue early!
Wrapping up and next steps
Growing a chilly chili pepper plant in a vertical spice garden is a rewarding way to bring bold flavors and lush greenery to even the smallest space! Whether you're a seasoned gardener or a curious beginner, these compact peppers prove that big heat doesn’t need big room.
With the right setup—like trellises, containers, and a sunny spot—you’ll soon be harvesting fiery fruits for salsa, sauces, or spicy snacks!
Ready to take the next step? Start small with one or two pepper varieties, experiment with flavors, and watch your vertical garden thrive. Happy growing—and may your harvest be hot! 🌶️💚