Picking
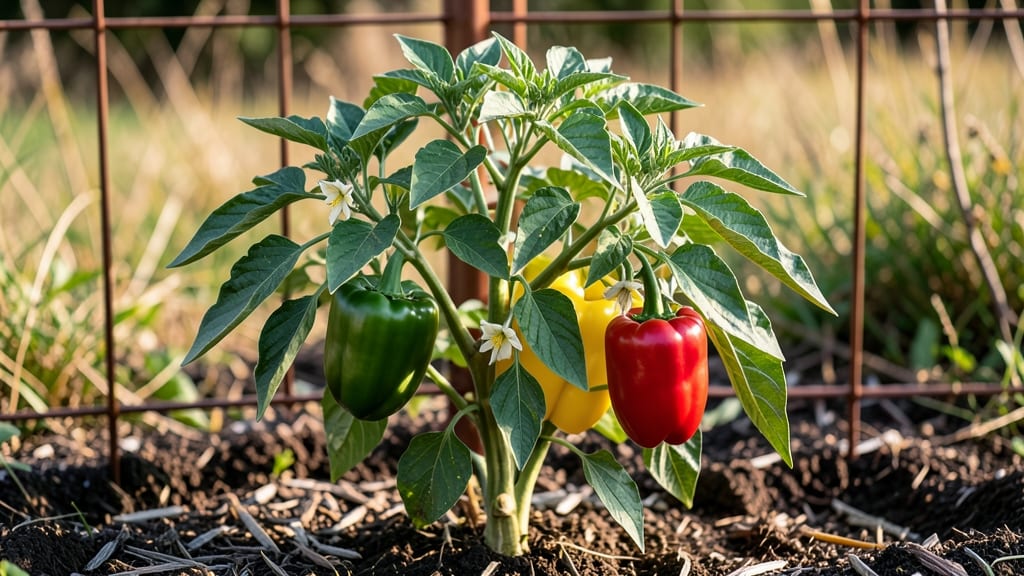
Growing Islander bell peppers on a trellis changes everything—no bitter aftertaste, no sprawling vines, just sweet, crisp peppers climbing toward the sky. 🌱 I planted mine last spring and harvested 20% more peppers than my ground-planted plants, all while saving space and reducing disease.
The secret? Pole training turns these heavy producers into vertical powerhouses that actually stay upright.
You’ll need full sun (6+ hours daily), well-draining soil with compost, and sturdy 6-foot stakes or a tomato cage. Islander peppers thrive in warm climates but can handle cooler zones if started indoors. Space plants 18 inches apart—closer if using a dense trellis system.
The key move? Tie main stems to the pole at planting, then weave side branches through as they grow. This keeps peppers accessible and reduces rot.
Water deeply once a week (2 inches total), always at the base to avoid wetting leaves. Feed with balanced fertilizer every 4-6 weeks, and prune suckers (those little shoots in the leaf axils) to direct energy upward.
By midsummer, you’ll see clusters of glossy green peppers turning red—harvest when fully colored for peak sweetness. The first taste? Shockingly lush, with none of the bitterness that plagues store-bought varieties.
Pests like aphids or hornworms love these plants, so check undersides of leaves weekly. A strong spray of water usually knocks them off, but neem oil works for stubborn infestations.
With proper care, you’ll harvest for 2-3 months straight—enough to share jars of roasted peppers with neighbors who’ll ask, “Where’d you get these?” (You’ll just smile and say, “My trellis.”)
📚 In This Guide
- What you need
- Instructions
- Tips and common mistakes
- Wrapping up and next steps
What you need
- ● Seeds or Seedlings: 5–10 Islander bell pepper seeds (or 3–5 healthy seedlings from a nursery).
- ● Growing Containers or Garden Beds: Containers: 5-gallon pots or larger (at least 12–18 inches deep) with drainage holes.
- ● Garden Beds: Well-draining soil in a sunny spot (6+ hours of sunlight daily).
- ● Soil: High-quality, well-draining potting mix or garden soil amended with compost (aim for a pH of 6.0–6.8).
- ● Fertilizer: Balanced, organic fertilizer (10-10-10 or similar) or compost tea for nutrient boosts.
- ● Support Structures: Tall trellis, stakes, or tomato cages (6+ feet high) for pole training.
- ● Soft plant ties or twine (to secure vines without damaging stems).
- ● Watering Supplies: Watering can, hose with gentle nozzle, or drip irrigation system.
- ● Pruning Tools: Sharp pruning shears or scissors (sterilized with rubbing alcohol).
- ● Mulch: Straw or shredded leaves to retain moisture and suppress weeds.
- ● Row Covers: Lightweight fabric to protect seedlings from pests or frost.
- ○ Growth Regulator: Optional plant food like seaweed extract to encourage bushier growth.
- ● Harvest Basket: A small, breathable bag or basket to gently collect peppers.
Step-by-Step guide to growing sweet, zero-bitter Islander bell peppers
Pole-trained bell peppers yield sweeter fruit and save space. Here's how to grow lush, productive plants.
🌱 Step 1: Start Seeds Indoors for Early Growth
Begin seeds 8-10 weeks before your last frost date. Use biodegradable pots (4-inch diameter) filled with seed-starting mix. Plant seeds ¼ inch deep—any deeper and they’ll struggle to emerge. I like to use a pencil to make small holes for precise placement.
Keep the soil consistently moist but not soggy—think of a wrung-out sponge. Place pots in a warm spot (70-80°F) with bright light. A seedling heat mat speeds germination, which typically takes 7-14 days. Watch for the first true leaves (not the initial seed leaves) before transplanting outdoors.
☀️ Step 2: Harden Off and Transplant Pole Supports
Two weeks before moving outdoors, start hardening off seedlings by placing them outside in partial shade for 1-2 hours daily. Gradually increase exposure over 7-10 days until they’re in full sun. This prevents shock and ensures sturdy stems for pole training.
At transplant time, install 6-8 foot tall trellis poles in the ground. Bury them 1 foot deep for stability. Plant seedlings 12-18 inches apart in well-draining soil amended with compost. Tie the main stem to the pole with soft plant ties as soon as it reaches 12 inches tall.
💧 Step 3: Water Deeply and Fertilize for Sweetness
Water at the base of plants 1-2 inches per week, keeping soil moist but never waterlogged. Islander peppers thrive with consistent moisture—dry spells lead to bitter flavors. Mulch with 2-3 inches of organic mulch to retain moisture and suppress weeds.
Feed plants every 3-4 weeks with a balanced fertilizer (10-10-10). I switch to a low-nitrogen, high-phosphorus formula when flowers appear to boost fruit set. Prune suckers (side shoots) to direct energy upward. You’ll know you’re on track when plants produce 10+ flowers per stem.
✂️ Step 4: Train Vines and Harvest for Peak Flavor
Gently weave new growth around the pole every 2-3 weeks to maintain an open canopy. This improves air circulation and reduces disease risk. Pinch back the top of the main stem when it reaches the pole’s top to encourage bushier growth.
Harvest peppers when they’re 3-4 inches long and fully colored—this ensures maximum sweetness. Use pruning shears to cut stems cleanly. Regular harvesting stimulates more production. Store peppers in the fridge for up to 1 week or freeze for longer storage.
Tips & tricks for pole-trained sweet peppers
Here's what nobody tells you about growing these sweet, space-saving peppers like a pro.
Germination Boost: The 70-80°F warmth range is key for those first sprouts, but I've found that placing pots on a seedling heat mat actually cuts germination time from 14 days down to just 7-10 days. This gives you a head start on the growing season. The trick is keeping that heat mat on a timer—only 12 hours of warmth per day is enough to speed things along without stressing the seedlings.
Transplant Timing Secret: Don't rush the hardening off process in Step 2. I've learned this the hard way after transplanting shocked seedlings that wilted within hours. Start with just 1-2 hours of partial shade, then increase by 30 minutes each day. The goal is to let those seedlings adjust to wind and sunlight gradually—think of it like giving them a mini vacation before their big move outdoors.
Pole Training Hack: When tying your plants to the 6-8 foot poles at 12 inches tall, use soft plant ties that can stretch as the stems grow. I've switched to fabric ties that won't cut into the stems like plastic or wire. Also, leave about 6 inches between ties—this prevents the stems from getting too constricted as they thicken. The open spacing also helps prevent disease by improving air circulation around the stems.
Harvesting Insight: Those 3-4 inch peppers might look perfect, but timing matters more than you think. I harvest mine in the morning when they're crisp and cool—this preserves their sweetness. And here's a pro move: Use pruning shears to cut the stem just above a leaf node. This encourages the plant to branch out and produce even more peppers. The plant will actually grow new branches from that cut point!
Pro Tips for Islander Bell Pepper
- Here's what nobody tells you about growing these sweet, space-saving peppers like a pro.
- Germination Boost: The 70-80°F warmth range is key for those first sprouts, but I've found that placing pots on a seedling heat mat actually cuts germination time from 14 days down to just 7-10 days.
- Transplant Timing Secret: Don't rush the hardening off process in Step 2.
Frequently asked questions
How long does it take for an Islander bell pepper to mature?
The Islander bell pepper typically matures in 70–80 days from transplanting, depending on climate and growing conditions. In warmer regions, you may see peppers ready to harvest as early as 65 days. Keep an eye out for firm, glossy peppers that have fully colored—no need to wait for them to turn red!
Why are my Islander bell peppers turning bitter?
If your Islander peppers taste bitter, it’s usually due to overmaturity or stress (like extreme heat or drought). This variety is bred to be sweet, so harvest early when peppers are still firm and glossy. If bitterness persists, check your soil pH—aim for 6.0–6.8 and ensure consistent watering to prevent stress.
Can I grow Islander bell peppers in containers?
Since Islander peppers are pole-trained, they thrive in 5-gallon containers or larger with proper support (like a trellis or cage). Use a well-draining potting mix and place containers in a spot with 6–8 hours of sunlight daily. Just ensure the container stays stable—peppers can get heavy!
What can I substitute if I can’t find Islander bell peppers?
If you’re craving the Islander’s sweetness, try yellow or orange bell peppers (similar flavor profile) or shishito peppers (milder and sweet). For a spicier kick, jalapeños or banana peppers work in recipes, but adjust seasoning—Islander peppers are zero-scoville!
How do I store harvested Islander bell peppers?
Store unripe Islander peppers in the fridge for up to 2 weeks in a paper towel-lined container. For ripe peppers, keep them at room temperature (like tomatoes) for 3–5 days to maintain sweetness. Avoid washing until ready to use—moisture speeds up spoilage!
Wrapping up and next steps
The Islander bell pepper is a standout choice for gardeners and chefs alike—packed with sweet, zero-bitterness flavor and easy-to-grow pole-friendly traits. Whether you're a seasoned gardener or a curious beginner, its vibrant color and versatility make it a must-have in your kitchen and garden. 🌱
Ready to grow your own? Grab your seeds, set up those poles, and let the Islander transform your meals (and your harvest) with its effortless charm. 🌿 What are you waiting for? Start planting today!