
Vegetables
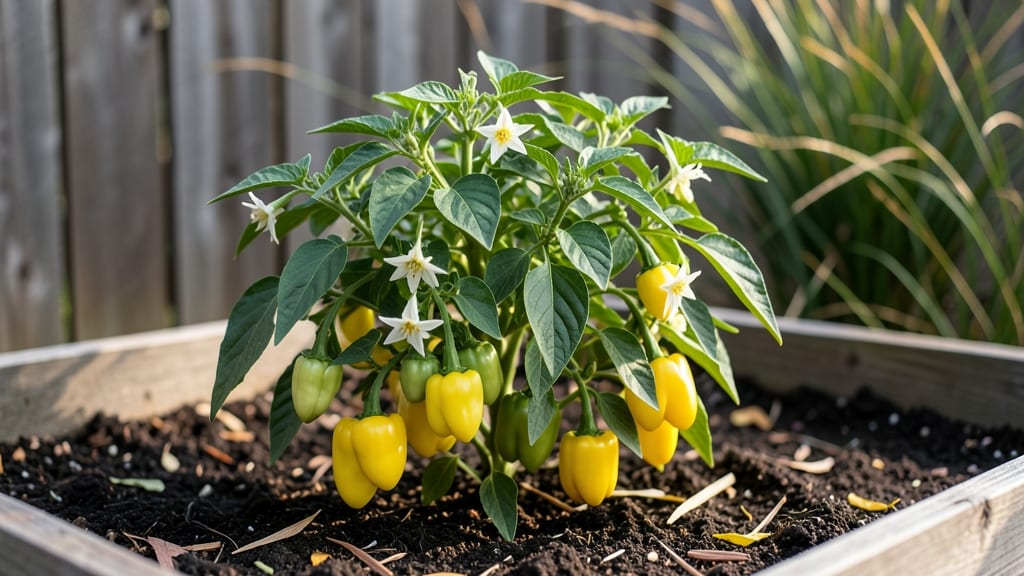
Growing small yellow peppers like 'Lemon Drop' or 'Golden Wonder' means sunshine in your garden without the sprawl. 🌱 These compact varieties pack a punch of flavor in just 12-18 inches of height, perfect for small spaces or vertical gardens where bigger peppers would flop.
Start with well-draining soil and a sunny spot (at least 6-8 hours of direct sun daily). Plant seeds indoors 8-10 weeks before your last frost, or buy transplants when soil warms to 60°F—they hate cold feet.
Water consistently but avoid soggy soil, and feed lightly with balanced fertilizer every 3-4 weeks once flowers appear.
By mid-summer, you'll be harvesting sweet, tangy peppers that turn from green to bright yellow. These aren't just pretty—they're versatile in salads, salsas, or roasted dishes. The key is pruning regularly to keep plants bushy and removing early blooms if you want bigger peppers later in the season.
📚 In This Guide
- What you need
- Instructions
- Tips and common mistakes
- Wrapping up and next steps
What you need
- ● Small yellow pepper seeds or seedlings: Choose disease-resistant varieties like ‘Lunchbox,’ ‘Mini Bell,’ or ‘Apache.’ Seeds: 5–10 (for direct sowing or starting indoors)
- ● Seedlings: 2–4 (if buying transplants)
- ● Containers or growing space: 5–10 gallon pots (with drainage holes) or
- ● Vertical planters (e.g., wall pockets, trellis bags, or hanging baskets with 12"+ depth)
- ● Small raised beds (minimum 12" deep, 12" wide)
- ● High-quality potting mix: 1–2 bags (1–2 cubic feet) of well-draining mix (e.g., 60% potting soil + 40% perlite/compost)
- ● Fertilizer: Balanced organic fertilizer (e.g., 5-5-5 or 10-10-10) or
- ● Slow-release granules (follow package rates)
- ○ Support structures (optional but helpful): Trellis, stakes, or cages (for indeterminate varieties)
- ● Clips or twine (to secure vines to vertical frames)
- ● Basic gardening tools: Trowel or small shovel
- ● Pruning shears (for trimming)
- ● Spray bottle (for watering seedlings)
- ● Watering supplies: Watering can or hose with gentle nozzle
- ○ Drip irrigation kit (optional, for automated care)
- ● Sunlight access: 6+ hours of direct sunlight daily (south-facing window, balcony, or greenhouse)
- ○ Temperature control (if starting indoors): Heat mat (optional, for seed germination)
- ● Grow lights (if natural light is limited)
- ○ Pest prevention (optional but recommended): Neem oil or insecticidal soap
- ● Row covers (for early-season protection)
Step-by-step instructions for growing compact small yellow peppers
Here's how to grow vibrant small yellow peppers in limited space without sacrificing productivity.
🌱 Step 1: Start Seeds Indoors at the Right Time
Begin seeds indoors 8-10 weeks before your last frost date. I use biodegradable peat pots filled with sterile seed-starting mix—this eliminates transplant shock later. Plant 2 seeds per pot at a depth of ¼ inch, pressing lightly to ensure good soil contact. The reason for two seeds is that germination rates vary, and having a backup ensures you don’t lose your pepper patch.
Cover the pots with a clear plastic dome or wrap to retain moisture and warmth. Place them in a warm spot (70-80°F)—a seedling heat mat works wonders if your home runs cooler. Keep the soil consistently moist but never soggy. You’ll see sprouts in 7-14 days, depending on your climate. Once they emerge, remove the dome immediately to prevent fungal diseases like damping-off.
☀️ Step 2: Provide Adequate Light and Harden Off Seedlings
Peppers need 12-14 hours of light daily to grow strong and compact. A south-facing window rarely provides enough intensity, so I use a full-spectrum LED grow light positioned 2-4 inches above the seedlings. Raise the light as they grow to maintain that distance—this prevents leggy, weak stems. You’ll know your light setup is working when seedlings have thick stems and dark green leaves spaced closely together.
Two weeks before transplanting outdoors, start hardening off your seedlings. Place them outside in a sheltered spot for 1-2 hours the first day, gradually increasing their time outdoors by 1 hour daily. This process teaches them to adapt to wind, sun, and temperature fluctuations. By the time you transplant, they’ll be ready to handle outdoor conditions without stress.
🪴 Step 3: Transplant Seedlings into Containers or Garden Beds
Small yellow peppers thrive in containers at least 12 inches deep or in garden beds with well-draining soil. If using containers, fill them with a mix of potting soil and compost—this ensures nutrients are readily available. Plant seedlings 12-18 inches apart to give them room to grow without crowding. Dig a hole slightly deeper than the seedling’s root ball to encourage stable root establishment.
After transplanting, water deeply to settle the soil around the roots. Avoid wetting the leaves, as this can lead to fungal diseases. Mulch around the base with 2-3 inches of organic mulch to retain moisture and suppress weeds. Place your containers or garden bed in a spot that receives full sun (6-8 hours daily)—this is non-negotiable for sweet, flavorful peppers.
💧 Step 4: Water and Fertilize for Compact Growth
Peppers prefer consistent moisture—water when the top inch of soil feels dry. I use a drip irrigation system or water at the base of the plant in the morning to avoid fungal issues. Overwatering leads to blossom-end rot, so always check soil moisture before watering. You’ll know your watering routine is right when the soil stays evenly moist but not waterlogged.
Feed your peppers every 2-3 weeks with a balanced fertilizer (10-10-10) once they start flowering. This encourages strong fruit production. I also add a handful of compost around the base monthly to boost nutrients naturally. Prune any suckers (side shoots) that form in the leaf axils to keep the plant compact and focused on fruit production. This step is crucial for small yellow peppers—it prevents the plant from becoming too leggy and ensures you get plenty of harvestable peppers.
✂️ Step 5: Harvest and Encourage Continuous Production
Harvest small yellow peppers when they reach 3-4 inches long—this encourages the plant to produce more fruit. Use pruning shears or pinch them off by hand to avoid damaging the plant. You’ll see new peppers forming within 2-3 weeks of harvesting. Regular harvesting keeps the plant productive and prevents it from becoming overburdened with fruit.
As the season progresses, continue to monitor for pests like aphids or spider mites. A neem oil spray works wonders for keeping them at bay without harming the plant. By following these steps, you’ll have a bountiful harvest of small yellow peppers—perfect for snacking, cooking, or sharing with friends. The key to success is consistency in watering, fertilizing, and pruning.
Tips & tricks for perfect small yellow pepper growth
Real talk: Growing compact small yellow peppers isn't just about following steps—it's about understanding the little details that make all the difference. Here's what nobody tells you about growing these flavorful gems successfully.
Germination Success: Planting two seeds per pot isn't just about backup—it's about giving yourself the best chance for strong, healthy seedlings. After those seeds sprout (usually within 7-14 days), remove the weaker one at the soil line, leaving the stronger seedling to grow. This prevents competition for nutrients and gives you a head start on healthy growth. I've lost count of how many times I've had one seedling outcompete its sibling, leaving me with a weak, leggy plant that never recovered.
Lighting Strategy: The 12-14 hours of daily light requirement is non-negotiable, but here's the trick: position your grow light so it's just 2-4 inches above the seedlings when they're small, then raise it as they grow. This prevents those sad, stretched-out seedlings that never develop strong stems. I've seen seedlings grow into these weak, spindly plants because the light was too far away—now I check the distance every few days and adjust accordingly. Look for seedlings with thick stems and dark green leaves that are close together; that's your sign you're doing it right.
Transplanting Technique: When transplanting those 12-18 inches apart, dig your hole slightly deeper than the seedling's root ball. This encourages the roots to grow downward rather than staying in a tight ball, which gives your peppers a stronger foundation. I learned this the hard way after transplanting seedlings that kept falling over—they needed better root anchorage. Also, make sure to water deeply right after transplanting to help settle the soil around those roots and reduce transplant shock.
Pest Prevention: Those pesky aphids and spider mites can wreak havoc on your pepper plants, but here's how to stay ahead: monitor your plants regularly, especially on the undersides of leaves where pests love to hide. At the first sign of trouble, mix up a neem oil spray (1 tablespoon neem oil, 1 teaspoon mild dish soap, and 1 quart water) and spray both sides of all leaves. I've found that catching pests early makes all the difference—once they've taken hold, it's much harder to get rid of them without damaging your plants.
Pro Tips for Small Yellow Peppers
- Real talk: Growing compact small yellow peppers isn't just about following steps—it's about understanding the little details that make all the difference.
- Germination Success: Planting two seeds per pot isn't just about backup—it's about giving yourself the best chance for strong, healthy seedlings.
- Lighting Strategy: The 12-14 hours of daily light requirement is non-negotiable, but here's the trick: position your grow light so it's just 2-4 inches above the seedlings when they're small, then raise it as they grow.
Frequently asked questions
Got questions about growing and using small yellow peppers? You’re not alone! Here are answers to the most common queries to help you master your compact pepper garden like a pro.
How long does it take for small yellow peppers to mature and produce fruit?
Small yellow peppers typically take 60–90 days from transplanting to harvest, depending on your climate and variety. In warmer regions, you might see peppers as early as 70 days, while cooler areas may extend this to 100+ days. Patience pays off—consistent warmth and sunlight speed up the process!
Can I grow small yellow peppers in containers or hanging baskets?
These peppers thrive in containers as long as the pot is at least 12–18 inches deep with drainage holes. Hanging baskets work too—just ensure they get 6+ hours of sunlight daily and use a lightweight potting mix. Compact varieties like ‘Lunchbox’ or ‘Apache’ are perfect for small spaces!
What’s the best way to harvest small yellow peppers without damaging the plant?
Use clean pruning shears or scissors to snip peppers at the stem (leave a tiny nub). Avoid pulling or twisting, which can harm the plant. Harvest in the morning when peppers are firm and vibrant. Pro tip: Pick regularly to encourage more production!
Why aren’t my small yellow peppers turning yellow? Are they ripe?
Peppers change color as they mature—green first, then yellow, orange, or red. If yours stay green, they may need more sunlight (8+ hours/day) or warmer temps (70°F+). Some varieties (like ‘Golden Calwonder’) stay yellow when ripe, so check size and flavor too!
What can I do if my small yellow peppers crack or split?
Cracking happens when peppers grow too fast after inconsistent watering. Keep soil evenly moist (not soggy) and mulch to retain moisture. If it’s too late, harvest cracked peppers—they’re still edible! For prevention, water deeply early in the day and avoid late-season droughts.
Are small yellow peppers spicier than other colors?
Not necessarily! Color reflects ripeness, not heat. Yellow peppers are often milder than red or orange ones because they’re harvested earlier. Flavor varies by variety—try ‘Lemon Drop’ for sweetness or ‘Lunchbox’ for a mild kick. Taste test to find your favorite!
Wrapping up and next steps
Growing small yellow peppers is a rewarding journey that brings vibrant color, bold flavor, and a sense of accomplishment to your compact garden or vertical space! 🌱 Whether you’re a beginner or a seasoned gardener, these versatile peppers thrive with the right care—think sunlight, well-draining soil, and a little patience.
With their fast growth and high yield, you’ll soon be harvesting crisp, tangy peppers to spice up your favorite dishes.
Now that you’re armed with tips and tricks, why not take the next step? Start with a single plant or expand your vertical garden today—your taste buds (and Instagram feed) will thank you! 🌶️💛