Container Gardens
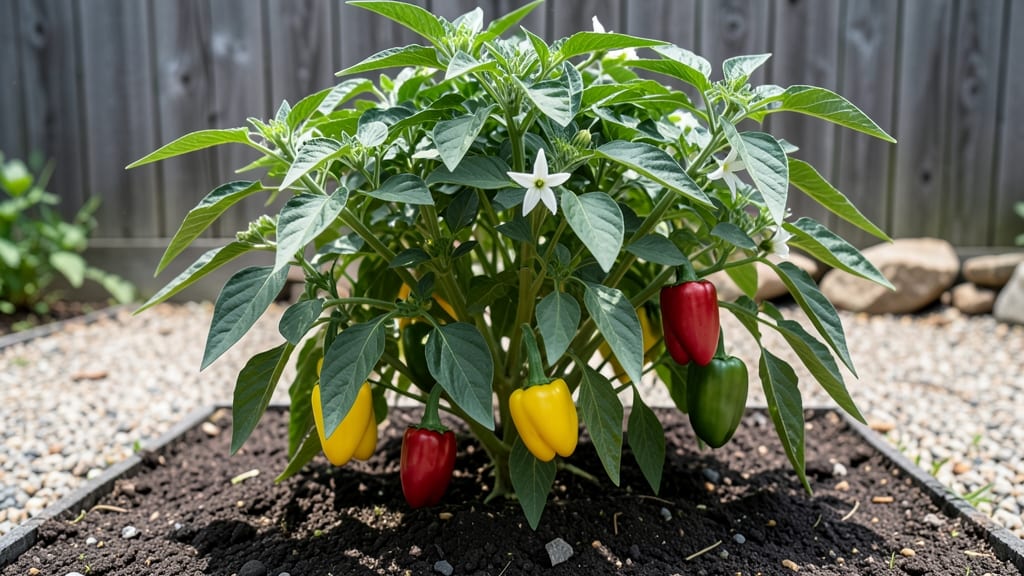
This pepper growing guide reveals how to turn your balcony into a mini pepper factory—just with timing, sunlight, and a little patience. 🌶️ a little patience. Most store-bought peppers take twice as long to mature, but with the right approach, you’ll be harvesting vibrant, flavor-packed peppers faster than you think.
The key starts with soil—peppers crave well-draining, nutrient-rich mixes (think 60% potting soil, 30% compost, and 10% perlite). If you’re starting indoors, sow seeds 8-10 weeks before your last frost, and move them outside only after nighttime temps stay above 55°F.
A sunny spot with 6-8 hours of direct light daily is non-negotiable; peppers bolt (flower prematurely) when stressed by heat or light deprivation. Water consistently—dry soil means bitter peppers, while soggy roots invite disease.
By day 60, you’ll be plucking peppers that burst with flavor, whether you’re growing sweet bells or fiery habaneros. The first harvest is just the beginning: prune strategically to encourage more fruit, and watch your plants reward you with weeks of continuous production.
Even in small spaces, peppers thrive in 5-gallon containers, making them perfect for patios, decks, or windowsills.
Here’s the game-changer: companion planting. Pair peppers with basil or marigolds to repel pests naturally, and avoid planting near fennel (it stunts their growth). With these tricks, your peppers won’t just survive—they’ll outperform anything you’ve ever bought at the store. Ready to grow your own heat?
📚 In This Guide
- What you need
- Instructions
- Tips and common mistakes
- Wrapping up and next steps
What you need
- ● Container: 5-gallon pot or larger (minimum 12" deep and wide per plant). Tip: Use fabric pots or self-watering containers for better drainage and root health.
- ● Potting Mix: 3–4 bags of high-quality, well-draining container mix (avoid garden soil—it compacts and retains too much moisture). Look for blends labeled "for vegetables" or "pepper-specific."
- ● Peppers Seeds or Seedlings: Seeds: 3–5 seeds per container (or 1 seed per 12" pot). Choose fast-maturing varieties like Early Jalapeño, California Wonder, or Sweet Banana for a 60-day harvest.
- ● Seedlings: 1–2 healthy transplants per container (buy from a nursery or local garden center). Pro Tip: Look for seedlings with sturdy stems and vibrant green leaves!
- ● Fertilizer: Balanced Fertilizer (e.g., 10-10-10 or 5-5-5): 1–2 tbsp per plant at planting time.
- ○ Slow-Release Granules: 1 cup per container (optional but recommended for steady nutrition).
- ● Liquid Fertilizer (e.g., fish emulsion or tomato/vegetable feed): Diluted to half-strength every 2–3 weeks once plants are established.
- ● Watering Can or Hose with Nozzle: A gentle spray or drip setting to avoid disturbing seedlings.
- ● Trowel or Small Shovel: For transplanting and mixing soil.
- ○ Mulch (Optional): 1–2 inches of straw or shredded leaves to retain moisture and suppress weeds.
- ● Grow Lights: LED or fluorescent lights for seedlings if starting indoors (12–16 hours of light/day).
- ● Support Stakes or Cages: 2–3 ft tall for taller varieties like bell peppers or habaneros.
- ● Succession Planting Kit: Extra seeds/seedlings to stagger planting for continuous harvests.
- ● Soil pH Test Kit: Peppers thrive in slightly acidic soil (pH 6.0–6.8). Adjust with lime or sulfur if needed.
- ● Pest Control: Neem oil, insecticidal soap, or row covers for aphids or spider mites.
- ● Heat Mat (Indoor Start): For germinating seeds faster in cooler climates.
Step-by-step instructions for growing peppers from seed
Here's how I grow bold, healthy peppers every season—whether you're working with a windowsill or full sun garden.
🌱 Step 1: Start Seeds Indoors 8-10 Weeks Before Last Frost
Fill seed trays with sterile seed-starting mix and moisten until damp but not soggy. Pepper seeds need warmth to germinate, so place the trays on a seedling heat mat set to 75-85°F. Plant seeds ¼ inch deep, spacing them ½ inch apart—they germinate best in groups but will need thinning later.
Cover the trays with plastic wrap or a humidity dome to retain moisture, then place them in a warm, dark spot. Germination typically takes 7-14 days, but don't be surprised if the first sprouts appear in just 5 days—peppers can be impatient little things. Once they break through, remove the cover immediately to prevent damping-off.
☀️ Step 2: Provide Bright Light and Gradually Harden Off
Move seedlings to a south-facing window or under grow lights (14-16 hours daily) once they've developed their first true leaves. Peppers need intense light to prevent leggy growth—if stems stretch toward the window, your light source is too far away. Keep them within 2-4 inches of the light as they grow.
Two weeks before transplanting, begin hardening off by placing seedlings outside in a sheltered spot for 1-2 hours daily. Gradually increase exposure to full sun and wind over 10-14 days. Watch for wilting or leaf burn—if you see either, they're not ready yet. Hardened-off peppers will bounce back quickly from minor stress.
🪴 Step 3: Transplant After All Frost Risk Has Passed
Choose a sunny spot with 6-8 hours of direct sun daily—peppers crave warmth and won't set fruit without it. Dig holes slightly deeper than the seedling pots and space plants 18-24 inches apart in rows 24-36 inches apart. This gives them room to spread and reduces disease risk from crowded foliage.
Water deeply before transplanting to reduce shock, then mulch with 2-3 inches of organic mulch to retain moisture and keep roots cool. Avoid wetting leaves when watering—peppers are prone to fungal issues, and damp foliage invites trouble. Stick your finger 1 inch into the soil; if it's dry, water again.
💧 Step 4: Maintain Consistent Moisture and Fertility
Peppers thrive with 1-1.5 inches of water weekly, delivered at the base of the plant. Let the top 1-2 inches of soil dry between waterings—consistent moisture prevents blossom-end rot, but soggy soil rots roots. Use a drip irrigation system or water early in the morning to minimize evaporation and fungal risks.
Feed with a balanced fertilizer (10-10-10) every 3-4 weeks once flowers appear. Too much nitrogen makes plants leafy but fruitless—peppers prioritize foliage over peppers when overfed. Look for dark green leaves and sturdy stems; if growth slows, it's time to fertilize again.
✂️ Step 5: Prune and Harvest for Maximum Yield
Remove any suckers (shoots growing between the main stem and branches) to direct energy to fruit production. Pinch off the first few flowers if your plant is leggy—this encourages stronger stems before the main harvest. Once peppers form, harvest regularly to stimulate more production. Use clean scissors or pruners to cut stems ¼ inch above the fruit.
Peppers are ready when they reach full size and develop their characteristic color—green, red, yellow, or purple, depending on the variety. Harvest in the morning when sugars are highest. Store in a cool, dark place for 1-2 weeks, or preserve by drying, freezing, or canning. The more you pick, the more your plant will produce!
Tips & tricks for perfect pepper cultivation
Let me share the secrets I've learned after growing peppers for years—these tricks will help you avoid common pitfalls and grow the most vibrant plants.
Heat Mat Hack: If you don't have a seedling heat mat, place your seed trays on top of your refrigerator (not inside) during germination. The heat rising from the coils creates the perfect 75-85°F environment without special equipment. Just make sure to remove them once sprouts emerge to prevent overheating.
Lighting Strategy: For those 14-16 hours of daily light, position your grow lights just 2-4 inches above the seedlings and adjust as they grow. I use a simple timer to automate the light cycle—this ensures consistent growth without you having to remember to turn lights on and off every day.
Transplanting Timing: When transplanting outdoors, wait until nighttime temperatures stay above 55°F consistently. I've learned this the hard way—peppers wilt dramatically when shocked by cold nights, even if days are warm. Check your local frost dates and add a week of buffer time for safety.
Pruning Precision: When removing suckers in Step 5, use clean pruning shears and cut at a 45-degree angle just above a leaf node. This prevents disease entry points and encourages faster healing. I also recommend pruning in the morning when plants are turgid—you'll see less stress on the plant.
Pro Tips for Pepper Growing Guide
- Let me share the secrets I've learned after growing peppers for years—these tricks will help you avoid common pitfalls and grow the most vibrant plants.
- Heat Mat Hack: If you don't have a seedling heat mat, place your seed trays on top of your refrigerator (not inside) during germination.
- Lighting Strategy: For those 14-16 hours of daily light, position your grow lights just 2-4 inches above the seedlings and adjust as they grow.
Frequently asked questions
Got questions about growing peppers in containers? You’re not alone! Here are some of the most common queries—and their straightforward answers—to help you grow a thriving pepper garden with confidence.
How long does it take for pepper plants to produce fruit?
Most pepper varieties take 60–90 days from transplanting to harvest, depending on the type. Bell peppers mature faster (60–75 days), while hot peppers like jalapeños or habaneros can take 75–90 days. Start seeds indoors 8–10 weeks before your last frost date to align with your harvest timeline!
Can I grow peppers in cold climates or containers?
Peppers thrive in warmth (70–90°F), but containers give you flexibility. Use black pots to absorb heat, place them in sunny spots, and consider a cloche or row cover to protect young plants from late frosts. Dwarf varieties (like ‘Mini Bell’ or ‘Snack Mix’) are perfect for containers and cooler zones.
What are the most common pepper plant pests, and how do I prevent them?
Watch for aphids, spider mites, and hornworms—they love pepper leaves! Prevent pests with:
- Neem oil spray (weekly preventive treatment)
- Row covers (early in the season)
- Handpick hornworms (they’re easy to spot!)
- Encourage ladybugs and lacewings (natural predators)
Why aren’t my pepper plants fruiting?
If your peppers aren’t setting fruit, check these 3 key factors:
- Not enough sun: Peppers need 6–8+ hours of direct sunlight daily. Move containers to sunnier spots.
- Temperature stress: Below 55°F or above 95°F can halt flowering. Use shade cloth in extreme heat.
- Lack of pollination: Gently shake plants or use a small brush to transfer pollen if bees are scarce.
When is the best time to harvest peppers?
Harvest peppers when they’re firm, glossy, and reach their mature color. For bell peppers, wait until fully green, red, yellow, or purple. Hot peppers (like jalapeños) are best picked when they turn their signature color but are still firm. Use clean pruners or scissors to avoid damaging the plant—leave a small stem attached to encourage more growth!
Wrapping up and next steps
Growing your own peppers is a rewarding journey that brings fresh, flavorful harvests straight to your kitchen—and you’ve got all the tools to succeed! 🌱 From selecting the right seeds to mastering container gardening, this guide breaks down every step into bite-sized, actionable tips.
Whether you’re a beginner or a seasoned green thumb, your 60-day pepper adventure is just a seedling away.
Ready to dive in? Start today:
- Pick your favorite pepper variety and grab your supplies.
- Plant those seeds and watch your container garden transform!